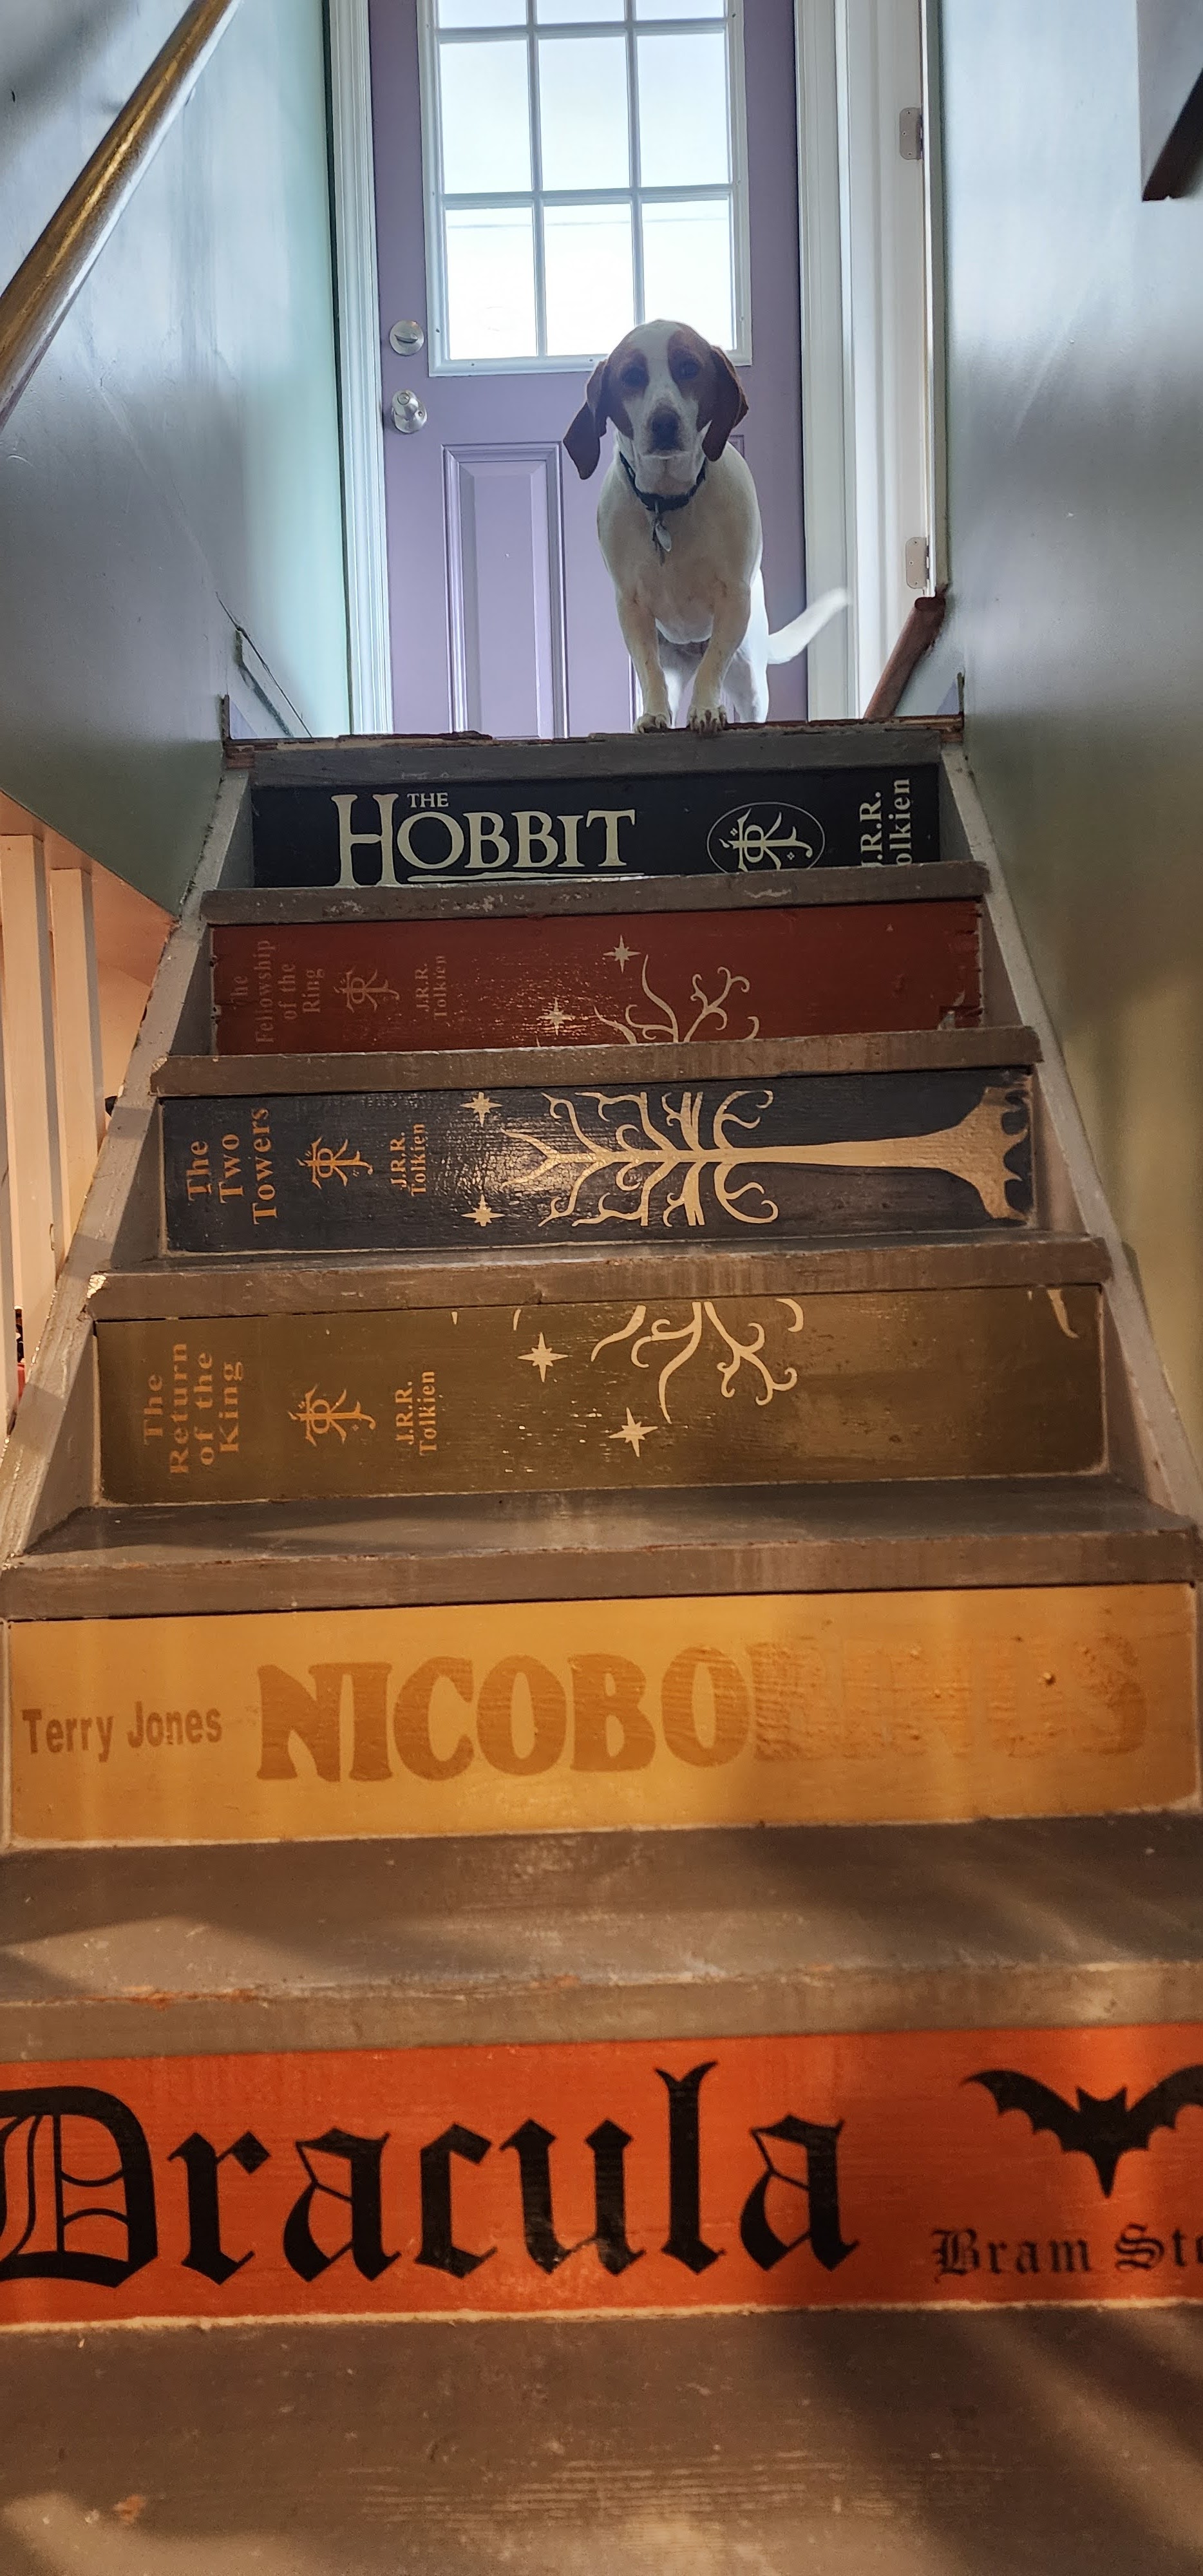
New Baby Traditions: Baby Guest Book

When Daisy turned 1 in September, I went through Baby Box. I arranged some photos of my pregnancy and Daisy through the year, collected a few crafts we (or really I) made with her little finger and footprints, and saved my most favorite of her tiny newborn clothes. The whole process is very bittersweet. You love seeing your baby grow, learn, and become a real person, but miss the tiny baby sounds and snuggles of infancy and wish time would slow just a little. I did the same with Jack. Their boxes are very much the same, except Daisy’s has a notable addition I wish I had for Giacomo’s. When Daisy was a newborn, we made her a Baby Guest Book.

Daisy's Guestbooks

When Giacomo was born, I took photos of him with every person who came to visit. Those photos were taken with my nice SLR camera and are saved out in the digital world. I did the same with Daisy, but I took it one step further and made the guest book by taking photos with a Fujufilm Instax Mini I borrowed from my niece for an instant picture and having each visitor write a little message for her. Some messages were as simple and sweet as “welcome to the world. I personally loved when children visited and left doodles (including a traced foot) and cute messages like “nice to meet you.” Then there were the longer notes that brought tears to my eyes, and one day they’ll do the same for Daisy. My family is big, so the books filled up quickly and now Daisy has a tangible (not digital) keepsake from each visitor she had the first few days she was born.

Some notes for Daisy


I wanted the photos to be protected by a cover sheet, so I bought 2 small 4×6 photobooks from Micheals. I cut white cardstock to 4×6 squares and filled each page with a blank square. After each photo was taken, I attached it to a 4×6 square with photo corners. Because the Instax photo is so small, there was ample room for a message next to the photo. I knew Daisy was going to be a girl and her name would be Daisy, so I designed the book covers to reflect her name and added some daisy stickers to the pages. For this baby, I will make the cover after we are home. I’ll also add some colored paper and maybe some decals within the book.

Simple Supplies


I got the idea from one of my girlfriends. Her book is styled a little differently than mine, but anyone can take the guestbook and run with it however s/he wants. For example, my girlfriend used a pretty journal instead of a photobook so the person writing had more space (and lines) for a message. I went to Micheal’s yesterday to get the materials for the books, and there are TONS of options for personal journals and books that can easily be used for this, so head out and make your keepsake!

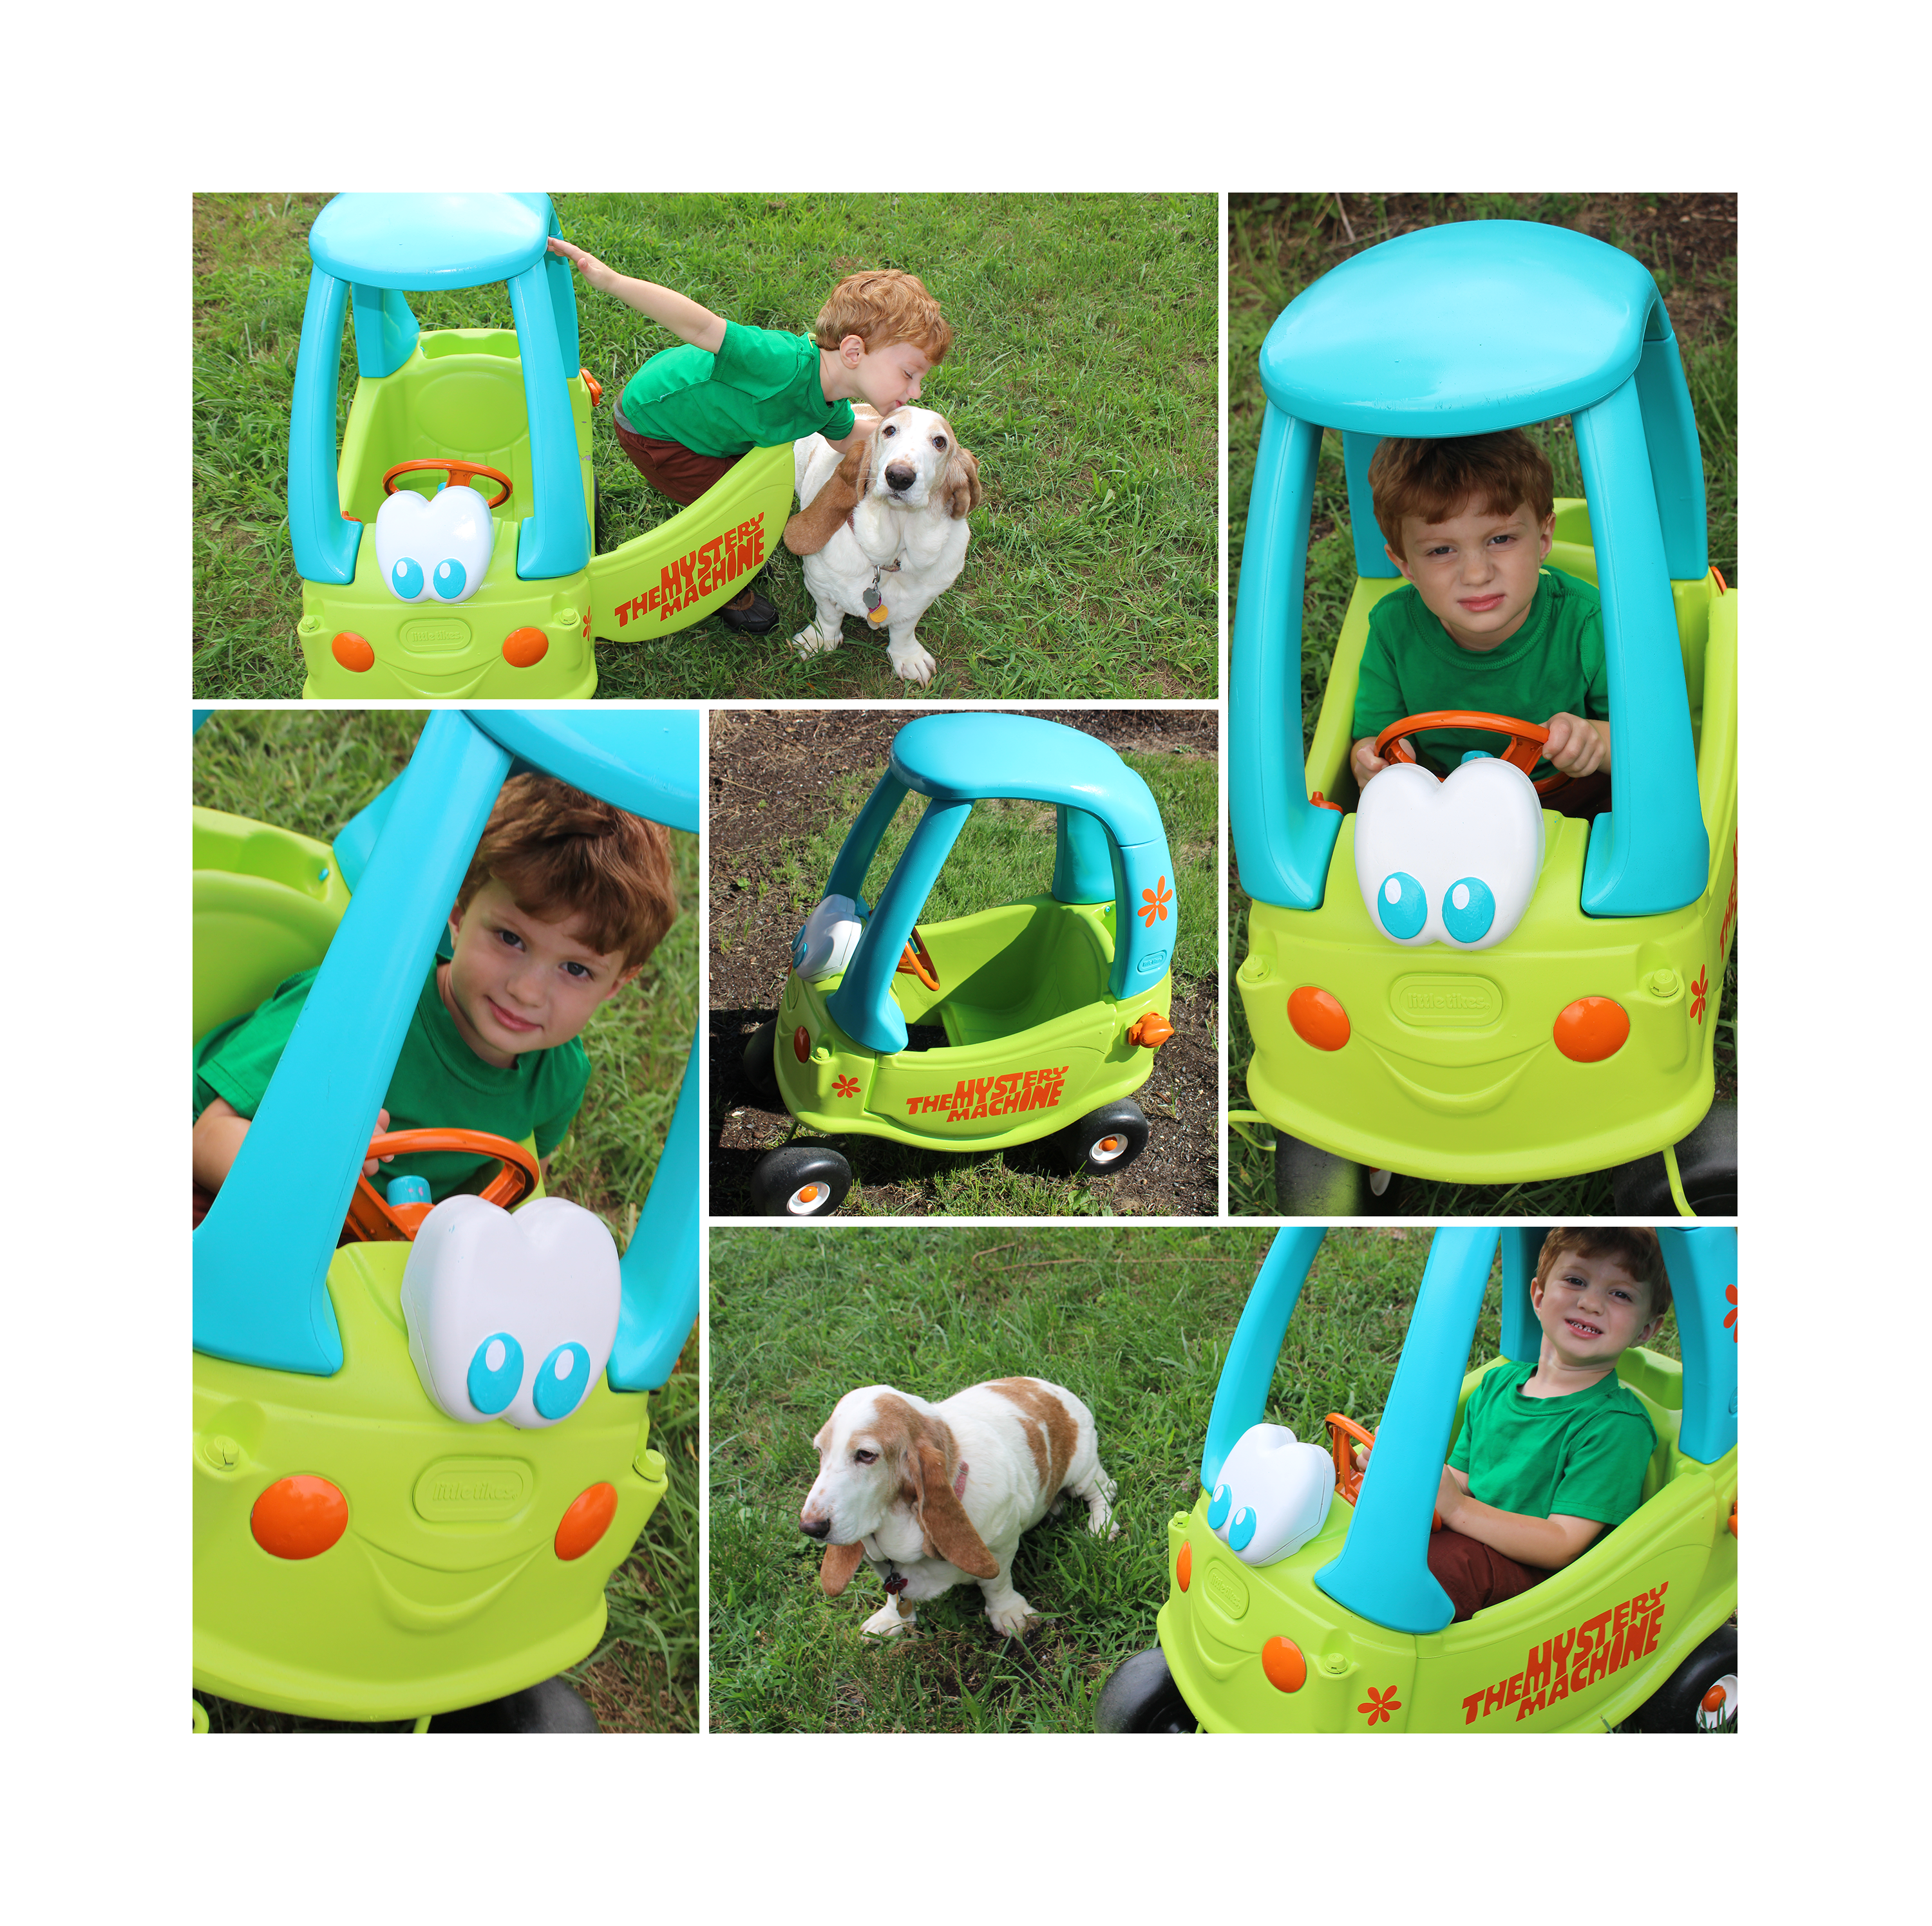
Mystery Machine Little Tykes Remake (An Eventful Summer)

It has been an insanely busy summer. We traveled a lot, and I spent a lot of time planning for a personal goal (I hope to have ready to launch in the next two weeks).  We went to New Orleans in early August, and a few weeks later we drove down to Florida and enjoyed the theme parks and Daytona.

New Orleans

Jack loved meeting his heroes, Mickey, Spongebob, and Shrek and Donkey. Daisy was less than thrilled about the characters, but had fun. We ended summer with Daisy’s first birthday. Oh I just can’t believe my baby girl is one!!

Florida

One thing I was able to do this summer in the craft realm was make this awesome Mystery Machine for Jack (and eventually Daisy). It was originally a pink and purple Little Tykes that my niece Myla long grew out of and donated to me.

Honestly, the hardest part about making this Mystery Machine was cleaning it because my hose was broken so I had to use a bucket of water. You have to take it apart to clean it well. All pieces come off easily except the tires. Instead of taking them off, I just tied bags around them.

Little Tykes Redo

After it is clean, just spray paint. For the tire wheels, eyes, and steering wheel, I sprays paint into a bowl and used a brush. Once all the pieces are dry, put it all back together. I made the Mystery Machine logo and flowers with my cricut and cut them from Oracle 651 vinyl.

Mystery Machine

Jack loved it so much he kissed it! So of course I dressed him up like Shaggy and had a mini photo shoot with it.

Jack Mystery Machine

Cute right? I hope your summer was wonderful!

At the Movie Theater Concession Stand Halloween Costumes

Halloween is over all ready. November 1 starts my unofficial boycott of Christmas. Not that I have anything against Christmas. I love it! But I’m sure like many others, I like to enjoy the fall and Thanksgiving, rather than rush into the holiday. It gets old by the time December 25th comes around.

So my boycott begins by again dwelling on Halloween. This year we were “At the Movie Theater Concession Stand.” The weather was beautiful this year. Jack joined in with Trick-or-Treating with his older cousins. I think he enjoyed the walking better than the candy, although he did dip into his bucket a few times during the walk. I took Daisy along too. Her costume was so good, most people didn’t even know she was there!

moviefamily


Like last year, I made costumes for almost everyone so we could walk as a theme.  I based the theme off Daisy’s costume: the popcorn bucket. I saw a version of it on Pinterest and knew I wanted to do it months ago, but my version was a bit more extreme. My version was made with a felt blanket I painted as a popcorn bucket using stencils I made from my Cricut. I used tissue paper as the popcorn and glued it to the blanket and to a baby hat for daisy. I just wrapped the blanket around Daisy’s carrier and tucked it in the sides. Her little head stuck out but was covered with the popcorn hat. I put on some 3D glasses and it looked like I was just walking around with a giant tub of popcorn at the movies.

angelaanddaisy


Jack went as a movie ticket and Matt was the Box Office Ticket collector, both costumes made with cardboard, Cricut cut vinyl, paint, and ribbon. The “over the shoulder” type costume was good for Jack because it was easy to put on and take off when he was fussy.

matt-and-jack


The rest of my nieces and nephew also joined the theme. I made 3 of their 6 costumes. I made Laila a cardboard Kit-Kat bar costume (I have a lot of cardboard on hand between boxes of diapers and wipes.) Olivia was Button candy, made with an old dress and painted Styrofoam balls. Myla was our cup of Coca-Cola, made from a small hamper, craft paper, paint, and vinyl. I especially liked her straw hat (complete with “Diet,” “Regular,” and “Other” buttons).

lailaoliviamyla


The store bought costumes were cute too – Craig was also popcorn, Angelina was an M&M, and Jenna was Nerds. I think we made a really cute concession stand!

movies

Using Transfer Paper to Make Freezer Paper Shirts

I went on a bit of a shirt making kick. I made maternity shirts, the baby shirts, and shirts for my husband, father, father-in-law, and brothers-in-law for Father’s Day. I learned quite a bit making them, and I like how they all turned out.

I made the baby a shirt for the 4th of July and a Finding Nemo inspired shirt, even though we probably won’t get to the movies to see Finding Dory with him.

Shirts 2

I also went a little crazy with Maternity shirts. I also made use of some glittler iron-on material I had for my heart and NJ shirts. My favorite is the watermelon shirt. The watermelon is in the Simply Charmed  cartridge for Cricut.

Maternity Shirts

I even made a Goonies shirt for my future little Goonie. I downloaded The Goonies font on Dafont. I think that one is Jack’s favorite.

IMAG1538_1_1

I created the Hockey Dad silhouette in Photoshop and uploaded it to design space. It’s my favorite! For the vintage looking dad/grandpa shirts, I found the Marcelle Script font on DaFont.com. It downloads with letters and different style swooshes.

Shirts 4

The thing with making freezer paper shirts is that it is really annoying putting all the tiny pieces in the proper place. (Especially with the “worn vintage” look of Marcelle Script, as well as characters like e, o, g, p, a, 4, 8, etc). When working with vinyl, most people usually use contact paper, plastic sticky paper used to line shelves, to transfer my cuts onto the surface. The problem is freezer paper isn’t actually sticky like vinyl. You have to iron the freezer paper onto the shirt for it to stick. Heat + plastic = bad,  so contact paper is out. Transfer tape is actually made to transfer vinyl to walls and objects, but a lot of brands are also plastic. I wasn’t sure if transfer paper would word or if the glue would ruin the shirts, but I figured I’d test it out and see. I made sure to get transfer paper made out of actual paper, not plastic.

Shirts 1

1 I cut the designs on the Cricut shiny side down on the mat. 2 I placed the transfer paper on the whole design 3 and rubbed well. 4 Figured out placement of design, 5 Then I ironed the design on low, dry heat. 6 After I removed the tape, 7 I ironed the design again with parchment paper, and it worked like a charm!

I was actually able to reuse the tape and transfer the design to 6 different shirts. I am sure I could have transferred more, but I only made 6 shirts at a time. The stickiness tape did not change much either. In fact, the transfers were easier the more I used the same piece.

Shirts 3

It seems obvious,  but I learned that it’s a lot harder to paint on a dark shirt than on a lighter colored shirt. I expected to have to use a few layers of paint for the dark shirts, but not as much as I actually used.  I think I’ll stick to painting designs on bright and light colored shirts, and using heat transfer vinyl on dark shirts.

Using Acrylic Paints on Clothing: The Best Fabric Medium.

I’ve seen so many cute baby and maternity shirts online, but at $15 (on the low end) for something a baby will grow out of so quickly seems like too much for me. But there is some hope for cute onsies! I’ve seen that you can use the Cricut, freezer paper, and paint to create clothes yourself. I’ve never heard of using freezer paper before, and I know paint makes clothes stiff, so I tested out it all out on an old t-shirt before trying it out on baby clothes.

You might think that fabric paint is a paint option I’d consider, but it is a little pricey (I’m cheap), and there aren’t nearly as many colors available in fabric paint than acrylic (I love color). Now I know from unfortunate personal experience that acrylic paint will permanently color clothes, but it will make your clothes hard, stiff, and scratchy. So did some research and found that you can add fabric medium to paints so avoid the problem. There are tons of different kinds you can find online, but I decided to go with the 3 I found at Jo-Ann’s so I could use coupons (and not pay shipping).

IMG_5128

I found 2oz fabric medium from Folk Art ($2.99), Americana ($2.49), and Delta ($2.49). All three had the same instructions: mix one part medium to two parts paint. I made sure to use the same brand of paints for consistency. Using Apple Barrel paints and a plastic spoon for measuring, I made a mixture of each medium in a different color.

IMG_5145

Folk Art: Green

IMG_5133

Americana: Pink

IMG_5139

Delta: Orange

IMG_5142

I put newspaper inside the shirt so the colors wouldn’t bleed through, but you could use cardboard too.

IMG_5148

I first just free painted a few squares onto the shirt.

IMG_5151

I tried out freezer paper to see how it’d work. I didn’t use my Cricut to make the stencil for this practice run; I just cut a few diamonds onto the paper.

IMG_5152

Iron the paper shiny side down onto the shirt.

IMG_5153

It worked!

IMG_5155

Paint over the stencil, then peel it away after a few minutes.

IMG_5159

The paint doesn’t have to be dry, just not soaking wet.

IMG_5163


Now the hardest part of anything you make is waiting.

Let the paint dry for 24 hours.

After 24 hours, heat set  the paint. In order to do this, I put the shirt in the dryer for an hour. You can also do this faster with an iron, but the dryer is easier and you don’t have to worry about the paint bleeding.

I wore the shirt after this, and there was a definite winner, but just to be certain I washed the shirt inside out on the delicate cycle, and I was sure to use fabric softener. This softened all the paints considerably.

IMG_5166

So what’s the verdict? All three paints are wearable, but for a baby onsie I wanted the paint to feel like it wasn’t even there. The Folk Art medium has, by far, the best texture of the three. You really can’t feel the difference between the actual shirt and the painted area. I think for 50¢ more this is the best bet, especially for baby clothes.

Folk Art

The Americana Medium worked really well too. The painted area was not scratchy or tough, but you can distinguish where the painted area is on your skin. A lot of store bought shirts feel this way, and it’s not uncomfortable at all. The Americana brand is also cheaper than Folk Art, so if you don’t mind the texture or  are wearing an undershirt, this is a good choice also.

Americana

I did not like the Delta Medium at all. The painted area was a much more stiff and scratchy on your skin. However I was reading reviews for this online, and many people used this medium for outdoor furniture. I could see using this for the cushions or pillows of a patio set, as outside textiles need to be a bit tougher to hold up to the weather. This brand also is  often sold in big bottles rather than the 2 oz bottles, so you could use it for larger area projects. So for clothing, this is a definite no, but for outside things, I might use it.

Delta

My first baby onsie project isn’t perfect, but oh I love it, especially the back (doo-doo)!

img_20160516_123607.jpg

Besides my Daisy, I know 5 other babies being born this year! I’ll be making lots of custom onsies now, like this one:

imag1049.jpg


Glittered Wine Glasses for President’s Day Weekend

After a break of a few years, we finally resumed our annual President’s Day weekend family reunion ski trip (or, for many of us, sit in a cabin in the mountains and hang our trip). My sisters, parents and cousins rent two side by side houses so we can bounce back and forth from the houses.

IMG_4538

I used to go snowboarding with my husband several times a winter, but I haven’t been able to since I hurt my knee. I’m so glad that this year all my gear was finally put to use; Matt took my niece Jenna out to try boarding. She had a great time with her dad and uncle on the mountain.

12710708_1201307933231033_8126977139350135232_o

To celebrate the re-start of our festivities, I made some pretty wine glasses for all the ladies in the trip.

image

The glasses are pretty easy to make, and as with anything with glue, the hardest part is the waiting between layers. I used the Cricut machine to cut out everyone’s initial and name in vinyl lettering for the wine glasses. I also glittered the stems of the glasses. If you don’t have a Cricut, you can still make glasses with glittered stems. We had a great time, and the glasses were a hit!

IMG_4553


For the monogram glasses:

  • I wanted contrasting fonts for the monogram letter and the full names, so I went with a full, swirly monogram and a thin, hand written font for the names.
  • I applied the whole name on the glass in gold vinyl in MV Boli (a system font already on my computer).
  • image

  • I applied the first initial on the opposite side in purple vinyl (to match the glittered stems) in a monogram font I found on dafont.com called Monogram kksc . You can download the same font here. 


image

For glittered stems:

Note – you want all of your coats of glue, glitter, and sealer to be thin. If your layers are too thick, they will eventually crack

  • First, wash and dry your glasses and use rubbing alcohol on the surface of where you are going to apply the glitter.
  • Apply a thin coat of Mod Podge to the stem and base of the glass.
  • Sprinkle on superfine glitter.

Purple Glitter Stems 1

  • Allow to dry for several hours or overnight. You will know the glue is dried by looking at the underside of the glass. If you see any white, the glue is still wet.
    Purple Glitter Stems 2
  • Apply another thin coat of Mod Podge and reglitter.
  • Allow to dry again.
  • If you need to, repeat the glue and glitter layers until your desired coverage. I only needed two coats of glitter, but you shouldn’t need more than 3 or 4.
  • When your last layer is dried, apply a very thin coat of Dishwasher safe Mod Podge*** and allow to dry. If you think you need to, you can apply a second coat after the first has dried.

Purple Glitter Stems 3


***Many people seal their glitter glasses with Triple Thick. I tried it with my glass, but it reacted with the dark purple glitter I used. I wasn’t sure if I did something wrong, so I asked about it on a crafting group page. Apparently certain glitter brands/colors will muddy and react the way mine did. I really like the feel of the triple thick sealer (it feels more like glass) so I will try to use it with another brand/color of glitter in the future and post if there’s a difference.

TT vs MP

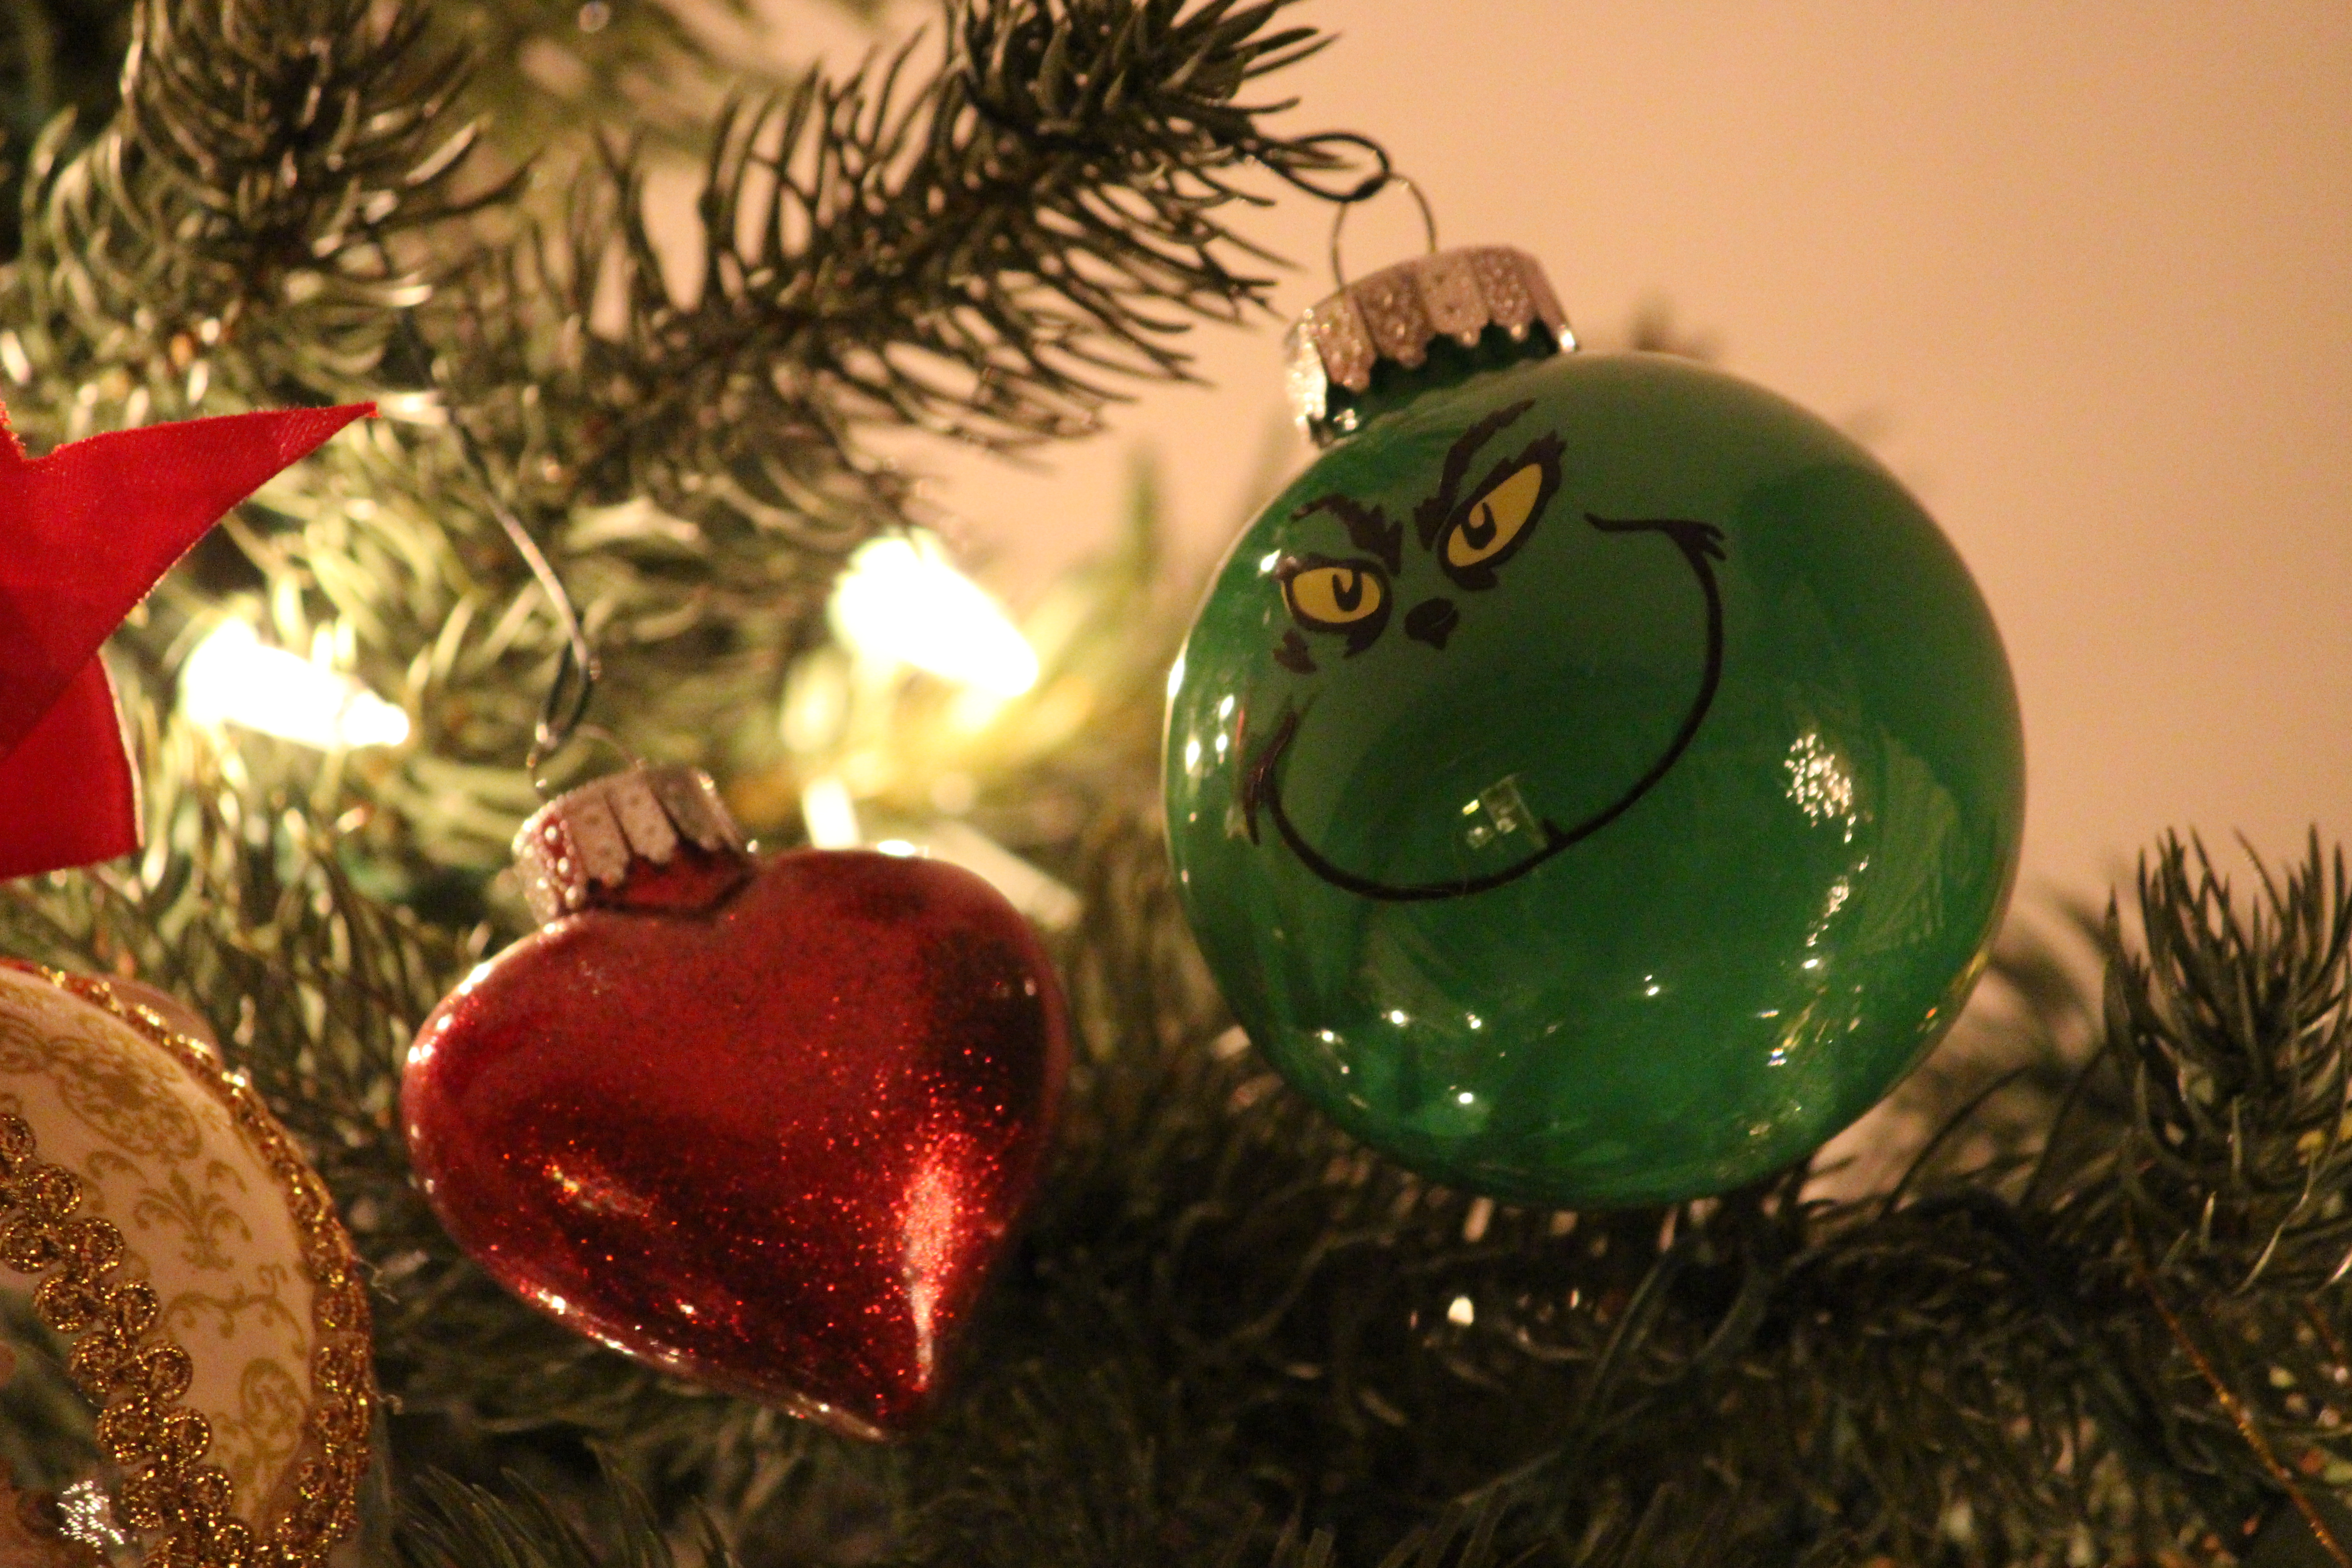
Grinch Ornaments for Giacomo’s 1st Birthday

It’s crazy to believe a whole year has gone by since my Mr. Man came into the world. I always say that the day he was born it felt like an explosion, that my heart grew 3 sizes that day like the Grinch. So for his first birthday, we had a Grinch themed party. Giacomo had such fun playing with his cousins, family, and friends.

Jack s party 2

I would have just had pizza and subs, but my sisters and mom took over and insisted on cooking a feast of antipasto salad (Truffula Salad), chicken cutlets (Roast Beast), sausage and peppers, kielbasa, pierogies, baked beans, pasta, potatoes and peas (Who Hash), and a 6 foot sub.  For I took over and went crazy.I couldn’t have done any of this without their help. I definately have the best family!

Jack s party 3

For dessert nieces made chocolate dipped marshmallows and decorated sugar cookies, while I went nuts making cupcakes, chocolate pretzels, Rolo pretzels, Oreo balls, pumpkin cheesecake, Rice Krispie Treats,  a regular cake and a smash cake for Jack, and Who Pudding. The kids even enjoyed a Hot Cocoa bar.

Jack s party 4

To thank everyone for celebrating, I made Christmas ornaments of the Grinch and his heart.

IMG_3680

For the Grinch ornaments, I swirled green paint inside the ornaments and left them upside down to dry. After two days I had to recoat. I let them dry about a week before adding the Grinch face.

Grinch

I layered yellow vinyl over black vinyl cuts for the ornament. Using the Cricut Explore, I cut the Grinch face by uploading  as a simple image. (I uploaded it twice, once for the face and once for the eyes). grinch clipart

I’ve made glitter ornaments with Glitter-It in the past, but I finally decided to try the mop & Glo method I’ve seen on craft sites and Pinterest. It does work, and it’s super quick! Just swirl the M&G in the ornament, drain out the excess, add in glitter, shake it up to coat, and tap out the extra glitter. Glitter-It works great, but so does M&G, and the giant bottle is way cheaper.

IMG_3227

I feel like the heart ornaments went with my whole year’s theme. All year I’ve been writing about the joys of the heart as well as heartache. The year started with my heart growing with Jack’s birth, and since then I’ve written about the joys of being a mom, the heartache of leaving baby, The Mighty Quinn’s Heart surgery, my dad’s heart attack, and now again, the joys of being a Mom.

Jack s party 1

I was driving home from the party, I was thinking how it was the first time I did something really “Mom,” and it was the first time I felt like Mom. Feeling like mom is subtly different than feeling like a mother or a mommy, and I’m not sure how to explain it, but giving my son a fun birthday made me feel like a Mom, and I loved it.

Jack’s Room: 3 Must Have’s for a Baby’s Room

Jack is on the move! Almost out of nowhere he started crawling and pulling himself up in his crib. As soon as he started, I immediately saw all the dangers in my house that needed to be baby proofed. I ran to Babies R Us, bought just about everything, and spent a weekend altering doorknobs and locking toilets – something I thought was ridiculous in the past, until stories of toilets clogged with race cars and towels were brought to my attention. I baby proofed the whole house, and the only thing I have left is to redesign the items on Jack’s bookshelf. The way they’re arranged now, he can easily pull them off and break them.

Jack's Room

We didn’t know if Jack was going to be Jack or Daisy, so we chose driftwood finish for furniture and painted the room a rustic yellow which goes nicely with the pumpkin butter color of our hallways. I figure we can reuse everything whenever baby #2 comes along.

I realize I never introduced you to Jack’s bookshelf or all the work I did in Jack’s room. Initially, it was a craft room/ guest room. Now, guest sleep on the couch, my crafts take over the house, and our recliner rocking chair is no longer in the living room, but that’s OK. One day we’ll figure out where to keep everything.  At my shower, I was given an IKEA bookcase that matched his bed set, and it was filled with books from everyone. Santa, the Easter Bunny, and I have since loaded the bookcase up with more books.

This is Jack's book corner. The walls have these cute Winnie the Pooh book plaques my MIL got for her future grandchild years ago (like before we were married). I'm thinking of making some kind of book piece for the adjacent wall. 

This is Jack’s book corner. The walls have these cute Winnie the Pooh book plaques my MIL got for her future grandchild years ago (like before we were married). I’m thinking of making some kind of book piece for the adjacent wall.

The thing I love most about his room is the tree decal. I ordered it and the window tree decals from TheWhiteTreeStore by LittleLionStudio.

https://www.etsy.com/shop/TheWhiteTreeStore?ref=l2-shopheader-name

The original tree looks like this, but there’s no law that says that’s how you have to apply it. Instead, I made the leaves look like they are blowing away. The decals are beautiful and easy to apply, and they really make his room charming. White Follow the Little Rabbit Tree Wall Decal by LittleLion Studio

The bed set is forest animals. Jack loves it. He uses the “bedspread” as a play mat, and he loves to talk to and touch the soft wall hangings as we pass them by. It has matching decals, but they were too small for the wall (for me at least). Instead, I used them to decorate his furniture. I used some of them for the sides of this storage bin I use for spare sheets, blankets and other baby odds and ends. I also decked the bookcase out with the rest of the decals that came with his bed set. I think the decals look so charming, and they can easily come off when he’s older.

Decals

I also decorated his room with my book bird houses.

Birdhouses2

So far I’ve made 3, but I think as he gets older I’d like to make some with his favorite books.

PLP

In the meantime, I made one with one of my favorite childhood books, The Monster at the End of this Book.

M@EOTB

My favorite birdhouse, though, is the Peter Pan house.

PPan

When you open the door, you can see Pan’s tree club house! Good thing I have small enough hands to do it.

Birdhouses

We have old doors which I thought about updating, but they actually match the style of our house and I’d rather spend the money elsewhere. Above his door is a simple cross, decorated with the finger rosaries I used as a favor at his christening. Next to his bed is a canvas quote I made using my Cricut and love best of all.

Jack's Room2

Now that you’ve toured Jack’s room there are a few things you should know. Every baby list will tell you about things you need for baby’s room, but here are the 3 things I always keep in here that weren’t on any list.

1) Extra blankets behind you on your chair. Babies spit up, and sometimes you don’t even realize it. Don’t ruin your furniture. Drape some receiving blankets over the backs of your chairs.

Blankets

2) A Rubbermaid bin. Jack grows so quickly and sometimes it feels like its overnight. I always keep a bin in his room so as I struggle to put on a tight fitting shirt, I can just pack it away into the bin for storage. I used to hid the bin behind the rocking chair, but now I got to lazy for that and it’s out all the time.

Storage Bin

3) Tissues and a trash bin next to your chair. This is completely  separate from the diaper bin and wipes, and it is essential. I realized their importance the day I got home from the hospital. When you bring home your baby, you will cry and for a variety of reasons. Maybe you’re overwhelmed, or maybe you’re insanely happy. Either way, you get home and you have no idea how raging your hormones are.

Tissues

I remember hearing I’d be hormonal and emotional during pregnancy, and I really wasn’t at all. It came after. For me they were all happy tears, and I cried over everything from feeling such deep love for my baby to Suburu commercials. Even reading baby books brought on tears. (Oh my God! He says he loves his puppy! *sob* *sob* That’s so beautiful!) You’re body is going nuts, and there’s nothing you can do about it. Eventually you’ll stop crying and you’ll need those tissues to wipe up baby boogers, but until then wipe your happy and your sad tears, toss the tissue in the trash bin, and if you’re lucky enough to get a colicky baby like me, rock on until the sun comes up.

Jack was always cryingRocking all night long

Using my Cricut Explore for Giacomo’s First Craft Project

I’ve been dying to use my Christmas gift since Christmas, the new Cricut Explore. I had a Cricut Expressions and thought it was silly to buy a new machine, but I wanted the new model so badly! It has easy material settings, can cut, score, and write on all kinds of material, and the design space online is awesome. All cartridges are uploaded into one space, and you can use multiple cartridges at once while designing each project.  I was so excited when Matt got it for me for Christmas.

I haven’t had the time to play with it until our recently. Giacomo takes up lots of time, and I had to wait for a day Matt was off of work. I started a simple design for Giacomo’s first craft project!  I saw the idea on Pinterest, of course.

Hand Sign

The phrase reads: First we had each other (12/12/00), Then we had you (12/12/14), Now we have everything.

We did the hand prints first. Matt’s first, then mine, then Giacomo’s tiny hand! How cute! I had to wait for him to sleep to do it, but it was still a bit difficult ( I see now why there are so many baby feet crafts as opposed to hand crafts). I did two signs in case one got messed up. Both came out great, so one will go into his memory box and one into his scrapbook.

After the hand prints dried I loaded the pages for the Cricut. I wrote the phrase directly on the page because I didn’t want to cut the letters and have to glue them onto the page, plus I wanted to try out the silver pen the machine came with. Loading the pen is easy. The Explore has a separate pen loading spot because it can simultaneously write and cut.

Cricut Pen

I used the design space to figure out where I wanted the phrase. In hindsight, I should have done the writing first and put the handprints around the phrases, but this happened to work out.

When designing something in design space, if you want your design to print and cut exactly as it looks on screen, you have to select all your design boxes and attach them in the layers panel.  This is as opposed to cutting to conserve paper, like if you were going to glue letters onto a bigger project.

attach

Just hit print and go! I think it came out great.

print Printing

I put one copy on the lid of his memory box.

Memory Box

So far, his box has his birth announcement, the box of chocolate cigars, His first little toy my niece got him, his hospital bracelets, his first Christmas hat, and the first blanket, shirt, hat, socks, and gloves from the hospital.

Memory Box

So far the box fits right on his bookshelf. Hopefully I won’t need a bigger box by the end of the year!

Memory Box

Halloween Week

Happy Halloween everyone! This is a favorite holiday of mine. I love Halloween week, especially!

I’m trying not to watch scary things while I’m so pregnant (I don’t want my heart racing too much), so we’ve been watching more fun Halloween movies. Nightmare Before Christmas, Hocus Pocus,  and all the fun Halloween TV show specials. Matt did try to sneak in one of the Friday the 13th movies, because I’ve never seen them, but I couldn’t stand how cheesy it was. I’m more into psychological thrillers like The Shinning or Psycho, or ghost/possession stories. Not so much the gory slasher stuff. They are always too corny. Last night we watched Adams Family Values and put together our crib, and I was thrown a work shower, complete with crafty decorations from my buddy Meg. This baby is starting to feel more and more real!

Work Shower

I worked from home on Halloween, so I was able to see all the trick-or treaters. I was surprised how many little kids loved my address pumpkin!

Address Pumpkin

Obviously I didn’t go out this year, but it didn’t stop me from dressing up. I used a Styrofoam sheet we got from the packaging from a crate to make my costume. I just cut a hole in the middle, measured out my belly, and then cut the edges in a sloppy circle shape to be an egg! I used Lilu’s costume from last year, a piggy, so we could be ham and eggs together :). If Matt didn’t have work, I’d have made him be a slice of cheese (aka himself). I made my nieces and nephew special little cauldrons of candy, complete with ghost pops. All you have to do is wrap some tissue paper around a lollipop, tie with some curling ribbon, and draw a ghost face. Aren’t we a cute bunch?

Halloween_2014

Tuesday was the season finally of my favorite (and very Halloween-esque) show, Face-Off. If you don’t watch it, you should! It’s a movie makeup competition show but with no drama or negativity, and based solely on the talent of the contestants. They even help each other even though they’re competing against each other. For the occasion, I made dinner with our baby wine.

So what’s baby wine? For my bridal shower, my bridesmaids gifted me a basket of wine. Each bottle had a special label designating the bottle for all out “first” occasions, including Christmas, new year, dinner party, anniversary, Valentine’s Day, and our last bottle, our first baby.

Here’s the poem written on our baby bottle if you want to recreate it:

“The news that a baby will soon share your life
will make you a mother, not only a wife.
You’ll see it through good times and sometimes through bad,
Angela the loving mother and Matt the dearest Dad.
Sadly Matt must drink this one alone and Angela with an empty glass.
Sit back and relax; nine months will quickly pass!”

Baby Wine

Since I can’t drink the wine, and Matt didn’t want to drink the whole bottle alone and on a work night, I finally busted open our baby bottle to use in my FaceOff dinner.

I don’t really measure, but I don’t think you could mess this up.
I first sautéed spinach with a little bit of olive oil, salt, and a few cloves of diced garlic. When the spinach is nice and wilted, remove from the pan and add some more oil and a few pats of butter. When the butter us melted and hot, add a diced onion and LOTS of diced garlic. I probably used 9 maybe 10 cloves. After the onions and garlic are sautéed, add in frozen shrimp and cook until they are almost done, then remove from pan. Add about half the bottle of wine, a ladle of pasta water, and some some oregano, basil, parsley, salt, pepper, and bay leaves.

Baby Wine Dinner

Simmer away until the alcohol is burned off. Put in the pasta, shrimp, and spinach back into the pan and toss it all together with a handful of breadcrumbs and another handful of Parmesan cheese. The shrimp should finish cooking in the sauce, and you’re ready to chow down! We had some fresh mozzarella with balsamic on the side, and I pretended to be fancy with my water in a wine glass. It was great food, a great finale (my favorite contestant, Dina, won!), and a great Halloween week.
Baby Wine Dinner 2

Previous Older Entries

Asterisk Gifts

(609) 549 22 38